
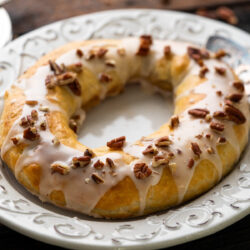
This Danish Kringle recipe is filled with traditional remonce filling alongside an array of chopped nuts and topped with a sweet and silky glaze to make a classic Danish pastry!
Homemade pastries always taste better than store bought because you take the time to make them with your own hands. Other recipes that include homemade pastries are my Apple Strudel, Easy Bourbon Pecan Tart, and Umm Ali (Egyptian Sweet Pastry Dessert)!

If you have not tried a Danish Kringle before you are missing out! This recipe will definitely satisfy any sweet tooth! The inside of the Kringle is packed with traditional remonce and an assortment of pecans, walnuts, and almonds for a nutty and textured filling. Of course, if that wasn’t enough, it is topped with a smooth and silky glaze to create a delicious Danish pastry!
What is remonce?
You may keep seeing the word remonce being used, but what is it exactly? Remonce is a traditional “paste” used in Danish pastries that is the combination of granulated sugar and butter. These two ingredients are combined together and baked along with the pastry.
How to make a Danish Kringle
Assemble your ingredients. For exact amounts see the recipe card below.

In a mixing bowl add in the flour.
Next, cut in the cold butter.

Then, add in the sour cream and knead until a ball of dough forms.

Wrap the dough in plastic wrap and refrigerate for 4 hours up to overnight.
While the dough is chilling, make the filling. Add the pecans, walnuts, almonds, sugar, and butter to a bowl. Mix until everything is combined.

Next, preheat your oven to 375 degrees Fahrenheit and line a rimmed baking sheet with parchment paper.
Assemble the Kringle. Coat a flat surface with a generous amount of flour and roll the dough into a long thin rectangle.
Spread the filling evenly over the middle of the rolled out dough.

Fold over one of the long sides over the top of the filling. Then using an egg wash, brush the other side and ends of the dough before folding them over.

Then, pinch the seam of the dough to ensure it has tightly closed and shape the dough into an oval shape. Pinch the ends of the dough together so that it forms one smooth oval shape.

Transfer the Kringle to your prepared baking sheet, seam side up and egg wash the outside of the Kringle.
Bake the Kringle in the oven for 25-30 minutes until the outside is golden brown. Note: You may experience some butter leaking from the Kringle, if this is the case you can sop it up with a paper towel once it has been removed from the oven.

While the Kringle is cooling, prepare the icing. In a small bowl mix together the powdered sugar, vanilla extract and milk.

Once the Kringle has cooled completely, pour the icing over the top of the Kringle.

Finally, garnish with additional nuts then serve and enjoy!

FAQs
What time of year should you make a Danish Kringle?
The truth is, there is no wrong time of the year for this delectable pastry. In traditional Danish fashion, you would see this on a table for any Holiday from Christmas to Birthdays or any family gathering or event.
What time of day do you serve a Danish Kringle?
Is this a breakfast pastry, or a dessert? Yes! This Danish Kringle can be served all day from breakfast with a warm cup of coffee to an after dinner dessert or even a late-night snack.

Storage Information
You can store this recipe in an airtight container on your counter for 3-5 days or in your refrigerator for up to 1 week!
More yummy desserts to try:
- Traditional PFEFFERNÜSSE COOKIES (Peppernut Cookies)
- Alfajores
- French Apple Cake
- Cannoli Dip
- Vegan Oatmeal Chocolate Chip Cookies
- Banoffee Pie
- Delicious and Easy ANZAC Biscuits
Danish Kringle Recipe
Ingredients
For The Dough
- 1 cup all purpose flour
- 1/2 cup sour cream
- 1/2 cup butter - cold, cut into pea sized chunks
For The Filling
- 1/4 cup pecans - finely chopped
- 1/4 cup almond slivers - finely chopped
- 1/4 cup walnuts - finely chopped
- 1/2 cup granulated sugar
- 1/4 cup butter - room temperature
To Assemble
- 1 egg - for egg wash
For The Icing
- 1/2 cup confectioners sugar
- 1/2 tsp vanilla extract
- 1 Tbsp milk
Instructions
- In a mixing bowl add in the flour.
- Next, cut in the cold butter.
- Then, add in the sour cream and knead until a ball of dough forms.
- Wrap the dough in plastic wrap and refrigerate for 4 hours up to overnight.
- While the dough is chilling, make the filling. Add the pecans, walnuts, almonds, sugar, and butter to a bowl. Mix until everything is combined.
- Preheat your oven to 375 degrees Fahrenheit and line a rimmed baking sheet with parchment paper.
- Assemble the Kringle. Coat a flat surface with a generous amount of flour and roll the dough into a long thin rectangle.
- Spread the filling evenly over the middle of the rolled out dough.
- Fold over one of the long sides over the top of the filling. Then using an egg wash, brush the other side and ends of the dough before folding them over.
- Then, pinch the seam of the dough to ensure it has tightly closed and shape the dough into an oval shape. Pinch the ends of the dough together so that it forms one smooth oval shape.
- Transfer the Kringle to your prepared baking sheet, seam side up and egg wash the outside of the Kringle.
- Bake the Kringle in the oven for 25-30 minutes until the outside is golden brown. Note: You may experience some butter leaking from the Kringle, if this is the case you can sop it up with a paper towel once it has been removed from the oven and cooled.
- While the Kringle is cooling, prepare the icing. In a small bowl mix together the powdered sugar, vanilla extract and milk.
- Once the Kringle has cooled completely, pour the icing over the top of the Kringle garnish with additional nuts, then serve and enjoy!


I am impressed; you used the Danish word for the filling and the recipe made a delicious kringle. Manga tak/Thank you.
Absolutely amazing recipe. Made this for the first time over the holidays and everything about the recipe was clear to follow. The assembly was easy. I did up the butter and nuts a little bit. The whole kringle was delicious – the dough was flaky and light, the filling was sweet but not overly sweet, and it baked perfectly. I also followed the same recipe to make a fruit kringle for my husband, but that had some oozing issues. This lasted two weeks on the counter covered. I did make the icing with water instead of milk to keep it counter-stable. Will 100% make this again over buying our annual kringle.
Steph, thanks for sharing your changes and the 5 star review!